Monthly Archives: April 2024

Eclipse Doodle

Here is my eclipse doodle art from 4/8/24

Yesterday my Dad and I went to Hawn State Park in southern Missouri to watch the eclipse. I took my drawing and doodling supplies with me to help pass the time while waiting for the main event. We left fairly early because we knew there would be a lot of traffic and we got there about two hours before the sun started to get covered up. The state park had a nice parking area for us in a mowed field. We had a little picnic and I sat on a blanket doing an eclispe inspired piece of doodle art with colored ink pens and markers.

I am very grateful that I was able to do this. I’ve been in physical therapy for the last several weeks for an arm and wrist injury. I’ve been severely limited in my usual activities for the last couple of months but I’m getting better. I’m slowly adding in my normal activities one by one as I do exercises to get stronger. I’ve added back in crafting, gardening, and now drawing. A week ago my wrist hurt so badly that I could barely address an envelope. This is my first drawing since the injury. I did it without pain and my injury doesn’t feel worse this morning. I’m on the mend and I’m very thankful. I think sewing is the last normal activity to re-try.

When I started this doodle, I knew I wanted to do something inspired by the color wheel. I decided to make each color inspired by a stage of the eclipse. I just doodled whatever came into my mind. As we got closer to totality, I started setting the stopwatch on my phone to go off every 10 minutes – then I’d look at the sun through the eclipse glasses and draw something inspired by that phase.

I kind of had a vague image in my mind of a weird foldout from the Voynich Manuscript as I doodled.
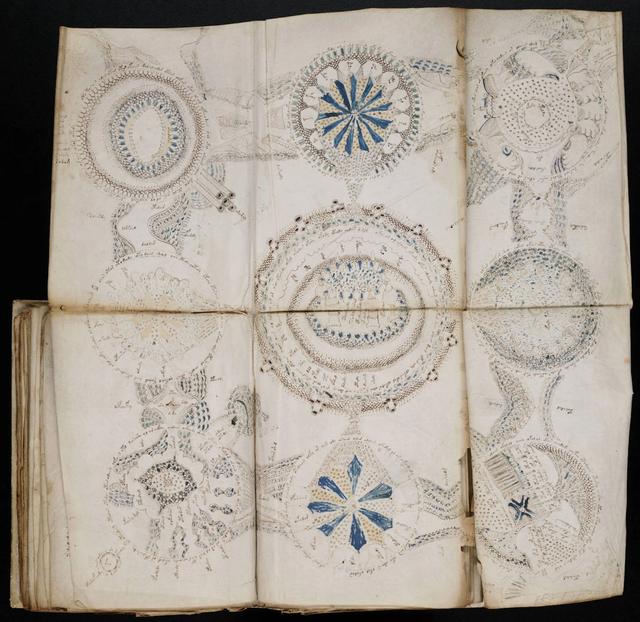
Without looking at a copy of any of the manuscript pages as I drew, I was just trying to get the feel of it, trying to imagine how someone trying to penetrate deep mysteries without the answers that we take for granted now might have reacted.

EDIT 5/15/24: I’m going to have to come back and revise this section. Now that my water garden has grown in a bit more this spring I can see that the cattails sprouted where the Water Willow was last year and what I identified as Water Willow in this article is Cattails instead.

I was also inspired by some plants in our outdoor water garden. I have a small stream as part of our outdoor pond. It acts as part of our filtration system because I run water through lava rock and plants that are in it. One of the plants I grow is a Missouri native called American Water Willow. The stems have really interesting cross sections. I was also thinking about these stems as I was drawing.

Cross sections of American Water Willow stems in my water garden. I don’t know why it’s called water willow. The flowers seem orchid-like, and the leaves seem iris-like. Oh well, its beautiful and native so what’s not to like?

Sitting in the warm sun on a perfect day in a beautiful park with my Dad was a treat. And I proved I can draw again so I can resume my plein air drawing group activities and watercolor painting classes that I was taking before I got injured. That’s a big weight off my mind! I also have a class coming up that I’m teaching – my first since the COVID pandemic – and I’m relieved to know I’ll be able to do a good job.

I haven’t wanted to talk about the injury unless I absolutely have to because it’s scary and I was embarassed. For example I wasn’t able to brush my hair and it got so tangled I asked my husband to cut part of it off. I have about four hairs in each follicle for every one that most people have, so my hair dresser has told me. It doesn’t take much for it to turn into an inpenetrable mat. So I was looking like a Harpy Eagle or like I was trying to audition to be in Night Ranger until I got it fixed. I’m slowly getting my life back together and resuming normal activities. That is a relief because I’ve been very stressed out by not being able to do what I normally do. It’s easy to feel isolated if you have an injury. If you ask for help you don’t know if you are going to get helped or attacked because people think you should be getting well faster. It’s humbling and it really makes me have additional empathy for other people who are strugging with something similar, whether permanent or temporary. I’m more grateful than I can say that the therapy is working.

Tiny Treat Basket

Here is a tiny treat basket I made for Easter. You can adjust the colors and themes to suit any occasion you want.

Here is an easy basket to make out of paper for handing out small treats or using as party favors. Each basket side is about 1 3/4″ square. I made these samples for Easter. The colors I used could also work for other spring occasions such as Mother’s Day, showers or weddings. Change the colors and design motifs for any occasion of your choice throughout the year.

Tools and Materials

Downloadable image file – Tiny Treat Basket
Scissors
Glue stick
Scrap cardstock, such as old file folders
Clean scrap paper
Bone folder or squeegee
Decorative cardstock and paper
Heart punch or other shape punch of your choice
Decorative paper edging scissors
Adhesive dots and/or double-sided tape
Washi/Design tape

Optional extras: basket “grass”, gift tags, embroidery floss, baker’s twine.

Instructions

Download and print out the template Tiny Treat Basket.

Tiny Envelope Treat Basket Template
Gluing parts cut from template printout to leftover file folder cardstock to make templates for tracing.

Loosely cut out the basket, handle, and one of the squares out of the printout. Leave a little paper outside the outline when you cut so that you can trim it closer after gluing. Glue the pieces down on the scrap cardstock with a glue stick, burnishing it well with a bone folder or squeegee to get a good tight seal on the glue. Cut out the pieces.

Fold in the flaps and seams to get a crease the fold back out before you use the basket template. Seeing where the folds are will help you make little pencil marks on the back of the tracing in case you need some to indicate where the folds will go.

Next trace around the shapes you just cut out onto some cardstock with pencil. Only one side is going to show when finished, so if your cardstock is double sided make sure your pencil lines are not on the side you want to show.

Trace squares, the basket, and the handle. Each basket uses two squares as shown, but I made four out of each piece of card stock I was using to have extras for making cards and other things later. Another reason it’s good to have extra squares is that if you use decorative cardstock that doesn’t have the same pattern all over, it’s easier to find combinations that you like with a variety to choose from.

Tracing around basket, handle and square shapes on the back of decorative thin cardstock.

I recommend making several baskets at a time – that’s the easiest way to experiment with colors and patterns to get the look you want. You can make them all match each other, or make them all different like I did.

Cut out the basket piece and handle with a plain scissors, and the squares with a decorative scissors. Punch out a bunch of shapes of your choice.

Cut out a bunch of squares with a decorative paper edging scissors and punch out a lot of hearts so you have a lot of choices to work with.

Take a basket cutout, and fold the flaps and basket sides in and out again to make creases. It’s best to fold toward the outside of the basket first before folding inward. The reason for this is that some colored papers have a white core which can show through if there is tearing along the fold. This shows far less if you fold toward the outside first.

Having creases at this stage makes centering the squares and the punched out shapes in the middle of each side of the basket much easier. Glue a square onto two sides of the basket, and a punched shape on the other two. Then glue a punch shape over each square. Place clean scrap paper over all and burnish well.

Here are some of the resulting color and texture combinations.

One layer of card stock is a bit flimsy for this project in my opinion. To make the basket and handle sturdier, I picked a complementary color of solid cardstock and glued it to the reverse side of the basket and handle pieces to make double thickness laminated cardstock. Then I trimmed around the baskets and handles with a scissors.

Now you can assemble the baskets. Place double sided tape on the flaps and fold in and press the basket together like a little box.

Reinforce each basket corner with design tape, also known as washi tape. Florals and butterflies worked really well with my spring theme.

Put adhesive dots or double sided tape on the top side of each end of the handle, then bend and position it in place. Press with your fingers where the adhesive dots are to firmly attach the handle to the insides. If you think the handle needs a bit more support, a piece of design tape over the join on the inside looks nice and makes the handle attachment stronger.

Here are more examples of Tiny Treat Baskets I made for Easter using different color combinations. I used paper scraps from making them to make little tags which I tied on with bakers twine and embroidery thread.

You’re done! Now you can fill the basket and tie on a gift tag if you want to.