Category Archives: Upcycling

Art Journaling By Selectively Covering Text

Sometimes I find and save advertising materials printed on nice paper. I might like part of the imagery, or be attracted to the weight and feel of the paper, or both. It’s sometimes less intimidating to start an art journal page on paper that already has something on it than a blank piece of paper. In this article I’ll show you two ways to creatively alter found papers with text on them.

Tools and Materials
Assorted found papers and scrap papers
Clean scrap paper
Stencils
Markers and other drawing and coloring implements of choice
Painter’s tape or masking tape
Scissors
Glue stick
Burnishing tool

First, select a piece of paper with text on it, and a stencil. Tape the stencil in place over the text. Using the marking implement of your choice, outline the openings in the stencil only in the spots where there is text to cover.

This results in an interesting effect. The text turns into a texture rather than something you read, and the resulting graphic effect might suggest what to do next to finish the composition. You might decide to color in some or all of the outlines you just traced over the text.

In the example above, since I’ve used permanent black Sharpie markers, I can use almost any medium I want to add color if I want to.

There is no need to restrict yourself to using a black marker. My brother got off to a very good start on this page. He took advantage of the pale text to use colored Sharpie markers. If he wants to work on this page more it has a lot of potential. Note: my brother died about three weeks after making this page. I don’t know if I’m going to add to it or keep it as is, but it’s in my art journal.

I have a real weakness for amoeba shapes and any graphics that suggest mid-century modern imagery. I cut these blocks of text from a magazine because of the pretty shapes and colors backing some of the text.

The article I took these cutouts from was about work-life balance. There are some words in these paragraphs that would be good to have in my art journal, which I use as a self-care tool as well as for creative expression. I covered up the words I didn’t want to see with strips of scrap paper and left exposed the words I did want to see. When the glue was dry enough to handle, I trimmed the shapes. Toward the end, I got tired of gluing paper strips and for the last few lines I wanted to cover, I used a yellow opaque paint marker to finish off these pieces.

Some people compose prose or poetry this way, by removing words instead of writing them to make new compositions. In this sample I was mainly interested in making a visual statement, and I treated the words as random elements. But if you wanted to, you could make a carefully considered visual AND literary statement by selectively covering words.

Here is a two-page spread using both techniques from this article together. I think these two pages are almost complete. I’ll think about them for awhile before doing anything else to them, if I decide they need more.

It helps that these two found pages here were already strong graphically, which was part of the reason why I was attracted to them in the first place.

More Examples

Following are more art journal pages that I started by selectively covering text. Enjoy!

Art Journal page
Art journal page. I covered up the light-colored text with vertical lines in gel pen. Then I used more gel pen, color pencils and a white paint marker to finish it off. The abstract stencil is one of my own design, the tree with birds stencil is made by The Crafter’s Workshop – it’s for sale in my Etsy shop.
https://www.etsy.com/listing/1142360780/mini-cherry-blossoms-6×6-stencil
On this art journal page, I partially covered the text by stenciling with black marker to make the text into a texture instead of something readable. Then I drew through more stencils with a mechanical pencil then colored in around the pencil marks. All four stencils used here are by The Crafter’s Workshop.
Art journal page with stenciling and coloring
I used a stencil that I cut myself and a commercial one by Tim Holtz on this art journal page. I made hatch marks blocking some of the text as part of the design. I blocked out some of the text with gesso and correction tape. I had fun playing with making the text cover-up part of the mark-making.

Every art journal page doesn’t have to be a masterpiece

I’m happy with how this two-page spread for my art journal turned out, even though it is kind of messy. Sometimes in the morning Tom will make the coffee before leaving for work and often he’ll leave a love note for me with good wishes for the day if I’m not awake yet. He uses paper left over from me printing out shipping labels for my online store. The leftovers just happen to be the size of my journal and planner pages. I punch holes in a lot of them and write on the other side when I want to take notes or record thoughts. Often either he or I will get coffee stains on the notes as you see here. Since I’m not starting with a pristine piece of high quality paper, there is no pressure on me to make a craft demo worthy effort every time I use these to make an art journal page. I did however greatly enjoy using stencils and stickers in the rough but satisfying example shown above to record a few thoughts about sharing morning coffee with my loved ones and having a healthy weekend.

In my last blog post, I wrote about the acronym G.R.A.P.E.S. and how the G stands for “Be gentle with yourself”. One way to do that is to take a little time to journal and let yourself off the hook if it doesn’t look like a brand ambassador did it. The activity itself is beneficial in many ways.

Stencils and stickers are real time savers when you want to slap something together without having to make a major art or design statement. I have a lot of supplies, but also I have a basic portable kit that includes some of my favorite stencils, a folio of colored pencils, gel pens, a few planner-friendly design tapes and some basic pencils and markers for writing and outlining. There are a few frequently used paper crafting tools in that kit like a burnisher, glue stick, hole punch, scissors, ruler and utility knife for cutting and sharpening pencils. I can get a lot done with that kit, and if I want to add more to the pages when I’m home, I have many more paper crafting supplies I can utilize.

The stencils I used in the two-page spread above are available in my online shop:

Mini Script Words

Mini Word Association

Mini Coffee Splotch

Mini Home Sweet

I have a couple of Pinterest boards full of more of my own examples along with samples, inspiration and tips from others on the topics of Art Journaling, Planners, Albums, Homemade Books and Scrapbooks. Enjoy!

Art Journaling

Planners, Journals, Albums, Scrapbooks and Handmade Books

Sitting by water and sewing – one of my favorite ways to relax

Sewing and relaxing by the water
Sewing and relaxing by the water. Far left – working on Experimental Art Quilt #1 in our backyard last summer within view of our pond, enjoying the waterfall sounds. Middle and right, Cole’s Creek campground at Carlyle Lake in Illinois. I’m at the far right under the camper canopy working on a salmon-colored shirt that I am patching and stitching on.

When I’m fortunate to get some time to relax, I like to take a portable art project like hand-sewing outdoors to work on. If I can set myself up by water, that’s even better! Better still to add human companionship by going on a group campout. It’s always nice to take a little break from kayaking and other active pursuits and sit down around a campfire. If I should happen to get stuck with a lot of rainy weather and have to stay under a shelter for awhile, I’ll never be bored waiting it out if I have sewing with me to do. I have more camping trips planned for this season so I’ve prepared some next steps in three different current sewing projects to work on while I’m out there. These are easy to transport rolled up and carried in a bin with a selection of sewing threads and tools.

Experimental Art Quilt #2 in progress
Experimental Art Quilt #2, begun in 2019, in progress.

I’ve readied the right side of Experimental Art Quilt #2 in preparation of adding some accents in blue scrap fabrics and blue thread. The image above shows how I used computer graphics to plan out the red triangle area that I sewed during the last campout. I knew the finishing touches on this were going to either make or break it, so I tested out the red area in Adobe Illustrator first before stitching it. I think after adding the blue area, I’ll go back to the pale yellow areas for a bit of subtle texture, then I think it will be ready for the border to complete it.

Scraps plus reverse applique

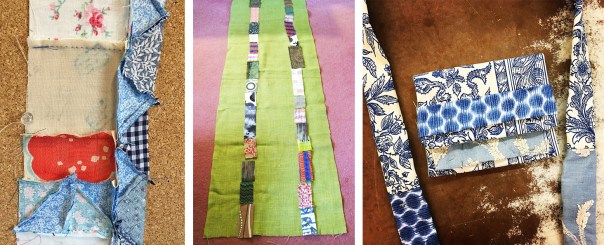
Here are some of the scrap strips I made earlier combined with some fabric that is going to frame it in a reverse applique technique. I make a lot of strips of both paper and cloth scraps to incorporate into other projects later. I’m turned on by the idea of one stripe being colorful and rest being all neutrals.

Making scraps into stripes
Far left: a journal cover made with strips of paper scraps. I revisit this way of working with paper and over and over and still not tired of it. Middle: an apron with strip piecing and applique on the front. I was going to add embroidery in the middle but decided it was enough without it. Seeing this image again of what I planned makes me want to make another one to see what the original idea would have turned out like. On the right is my mother-in-law with the reverse applique Easter apron I made for her.
Pattern from my favorite shirt in the 80s
My favorite shirt in the 80s and lifting the pattern from it.

My favorite shirt from the 80s is on the left. It used to be white and black with short sleeves and a collar. Over the years, it got so stained and faded that I stopped wearing it, but I could not bear to get rid of it because I loved the pattern so much. In 2018 I dyed it my favorite color lime green when I had a batch going for my wedding, and last summer I cut the collar and sleeves off and made it into a vest. Now I wear and enjoy it once more!

On the right is that salmon-colored shirt I’ve been stitching on. When I bought this shirt it was white with black. Yes I still love black and white shirts with Aztec-looking designs on them! The first time I wore it, it got stains on it from riding a chartered party van to and from a Rush concert (May 2015 during their farewell tour – EPIC day and night by the way – my brother and his friends started partying at brunch, I joined in a group pre-show BBQ about 3 pm after getting my day’s work done). I don’t know what got on the shirt, but I could never get it out. I put it aside for future dye experiments to try to fix it. I made two different mistakes when dyeing because I was in a hurry and ended up with even more stains and splotches to try to cover up. So I decided to put embroidered patches on all the bad spots until they were all covered up.

Shirt patches #2
Transferring design traced from older shirt to patches for newer shirt. I scrambled the old design a bit to make it just a little different. That’s not the first time I’ve reproduced part of this shirt design for a project – my very first experiment with linoleum block printing in 1985 used part of it! I wanted to print it on EVERYTHING.

Patches on the front are done, though as it gets closer to completion I might add some decorative trim from top to bottom around the center panel to tidy it up. It doesn’t have to be symmetrical, but I think it needs to be a little neater. Now I’m starting work on the back. Sleeves will be last. Although the look is different, the concept of patching clothing with decorative stitching was done very well by the Japanese with the art of Boro, which I would love to try out in the more traditional Japanese manner sometime.

This was a lightweight, airy shirt when I first bought it – now it’s going to be a bit heavier because of the layers, maybe for fall wear. Probably when it gets close to completion I’ll add some white or metallic or both to the yoke area to bring the focus back to the neckline area. In the meantime, I’m having a lot of fun doing the stitching in different weights and colors of thread, like salmon, peach, rust, and coral to see what happens!

Give a piece of print fabric the look of a “blanket”

Recently I was working on a sleeping bag for a doll, and I was looking around the house for a doll or stuffed animal that I could use to test out the size. I didn’t use it because it was too big, but I did look at a doll of sorts that I made a long time ago in sculpture class when I was working on a B.F.A. degree at SIUE. At the time I had taken the class, I had just been on a trip to Utah and had brought back with me some books on Native American petroglyphs and stone fetishes. I made a throw pillow sized soft wolf fetish with blanket and soft arrowhead for my late friend June for Christmas that year. We both shared an intense interest in Southwest travel and art. For class I made a humanoid stuffed figure with amulet bag, loincloth, and blanket.

While making the soft sculpture, although inspired by ancient Native American art forms, I did not want to refer to any particular culture exactly, rather I wanted to evoke an ancient sense of humanity that many cultures share. Throughout human history there were many ways to wear and use blankets as a part of clothing and outerwear before things like buttons and zippers were invented, and of course people still use and wear blankets in many ways today. For my soft sculpture’s blanket I chose a fabric in a garish early 1990s fabric pattern to suggest a striped blanket but not imitate any particular culture.

While working on my doll sleeping bag, I decided it was a good time to update the look of my soft sculpture. Since teaching at JoAnn Fabrics and Crafts from 2016-early 2020 I’ve been working a lot more with fabric. I decided to start with the blanket. I have a large collection of scrap fabric that I like to sew into strips to use in projects such as art quilts, purse straps, water bottle carrier straps, table runners, headbands, and more. I thought the blanket I made for the soft sculpture would look more attractive with some added strips of scrap fabric so I started piecing and sewing strips in place.

Experimental projects using fabric scraps.
Experimental projects using fabric scraps. From left to right: what will become part of Experimental Art Quilt #2 (still in progress), a table runner that I have used in many art and craft shows, and a purse with strap that I made for a niece as a graduation gift. The purse folds out so that it can be used as either a little clutch purse or a water bottle carrier. The strap is removeable and can be used in different ways.
Old blanket piece with new scrap strips held up against it to see if the colors and patterns look good together.
Left: old blanket piece with new scrap strips held up against it to see if the colors and patterns look good together. Right: an endcap I put together for Schnarr’s Hardware in Webster Groves, MO to showcase some supplies for fun summer craft and home decor projects. I used my refreshed blanket a backdrop for some blank wood succulent shapes ready for painting and decorating. On the other half, I draped a piece of nautical themed fabric. Over both backdrops are hung nautical themed flags that I sewed last summer.
Here is how to start a scrap strip.

Here is how to start a scrap strip. Decide on a color scheme and lay out pieces of fabric to use. Here I decided on a neutral scheme for a future project.

Place fabric pieces good side together, and pin along one edge. Keep going until you have pinned enough pieces to make a strip as long as you need for your project. The first two photos show the same strip from the front first, and then the back, after pinning.

Using a washable fabric marking pen and a ruler, draw a line along one edge, leaving a small seam allowance. Drawing the lines will help you keep your seams straight.

Sew all the pieces together and you’ll have a strip that you can use for many projects.

Temporarily pinned stripes in place on print fabric to see how the colors and patterns look together.
Temporarily pinned stripes in place on print fabric to see how the colors and patterns look together. A fabric pattern that has some kind of stripes or regularly spaced shapes that you can use to line up your stripes will save you a little time measuring and drawing lines on your fabric, but of course any fabric that looks good as a background would work.

I finished the quilted sleeping bag for dolls

In a past blog post, A little weekend quilting, I showed a narrow quilt top remnant that I was given and described how I was quilting it for practice.

A long narrow quilt top remnant that I decided to turn into a doll sleeping bag.

I used new cotton batting for the middle layer and a piece of a ripped gray bed sheet as the backing. I took parts of the waistband from an old pair of jeans and sewed them to each end, then used gray quilting seam binding to finish the edges. I used a piece of the seam binding to make a loop for hooking on a carabiner to hold the doll’s adventure camping gear.

The poor beat up Raggedy Ann doll was mine when I was young. I am pretty sure my Grandma Hasenfratz made it for me. She was an expert at sewing and crochet. She made me a lot of great things, many which I still have! I don’t know what happened to this poor doll’s clothes, but I’m thinking of making some new ones for her for the heck of it!

I sewed a lot of doll clothes when I was young – they were not well done. A lot of them were just draped fabric scraps that I sewed on and then ripped off when I got tired of them! In my mind my Barbie doll was an explorer and archaeologist by day but she must have had a very active night life as well – I sure did make her a lot of evening gowns! I had a kit to help me make good Barbie clothes but I don’t think I ever mastered it. I’d like to get some practice at making some that look reasonable, if there is time someday.

For the finishing touches on the sleeping bag, I made a two-sided pillow. I sewed one side of the bag together only about halfway up to that it’s easy to get a doll in and out, and put in snaps for a snug fit on cold nights!

I didn’t write down my process while making this, but I did take a lot of pictures so I can remember what I did if I ever want to make another.

Homework, art journaling and stencils!

Art journaling is an activity that helps me a lot with self care, artistic expression and just general management of life. Lately I’ve been experimenting with combining some artistic expression with material I’m learning in Social Engineering class. There are a lot of acronyms and concepts to remember – things that lend themselves well to bullet journals, art journals and chart and graph type graphics.

These pairs of pages you will see are in progress. I made them to have something to do adult coloring and other paper craft based activities on when I want to relax and be creative for a bit. As I work I can study and memorize the “bullet points”. I’m going to erase some of these pencil lines as I go. For a couple of the more complicated layouts I made drawings on tracing paper and chipboard templates to help cut the paper pieces to the right sizes and shapes.

Some of the stencils I used are commercial products I sell in my online Etsy shop. If you would like to see the selection, it’s at this link: Stencils and Stenciling Supplies.

I hope these pages in progress will give you some ideas for organizing information in a creative and fun way!

Two-page spread for MAPP – Mitigation and Prevention Plan.
Here is a pair of pages I began to create my rendition of “Curtis’ Triad of Disruption”. I love geometric shapes, and trios. This will be fun to work on!
I finally finished “Triad of Disruption” on 12/30/22! I did a couple of things a bit different than I planned.
Social Engineering Pyramid two-page spread on tracing paper and then started in the art journal.
Finished coloring these two art journal pages.
Finally finished coloring these two art journal pages.

I finally finished “Experimental Art Quilt #1!”

A little over two years ago, I was sick for quite awhile with an awful sinus problem. I didn’t have much energy, so to prevent too much boredom I looked for some simple tasks to do. First I sorted all my small fabric scraps by color and organized them into containers. While doing that, I thought it would be fun to challenge myself to see how small a fabric scrap could get before I couldn’t make something out of it. I wanted to upgrade my hand-sewing skills and learn the rudiments of piecing for quilt making.

I started sewing fabric pieces into strips to combine into a scrap quilt later, after seeing some beautiful examples on Pinterest. As I accumulated strips, I combined them with other leftover fabrics such as a jean pocket, a waistband from some corduroy pants, a seam from blue jeans, old clothing tags, ribbon, binding strips, selvage pieces and some rather primitive embroidered panels I made a long time ago for use on a tote bag which has since been retired.

Over the last couple of years, every once in awhile I’d add a little bit more on. Then I finished it with blanket seam binding from JoAnn Fabrics and Crafts where I taught classes in hand sewing, general crafts and jewelry making before the pandemic.

Following are some close-ups of sections of the quilt.

At the top is part of a waistband from some Lime Green corduroy pants.
Here is the top seen a little closer.
Here is a close-up of some stitching. I had some fun adding on some pieces with raw edges and treating some of my stitches like I was drawing on abstract collages in one of my art journals.
On some sections I used the pattern on the fabric as inspiration for how to do the quilting stitching. There are fabrics in this section from one of my old sheets and even a couple of pieces that I printed on with rubber stamps of my own design.
Here is the pocket. The jeans they came from were not mine – I’ve had them in my fabric stash for so long I’m not sure where they came from. The light colored denim pieces tie-dyed with black are from a pair of jeans I dyed and wore in college.
Here is the bottom end. There are fabrics in this section from sewn items my late Mom made in the early 1980s, some more fabric I printed and fabric from the ties and table runners from my wedding! My quilting friend Kate also gave me a lot of beautiful scraps I used in this section.

“Experimental Art Quilt #1” is for sale on Etsy. Here is a link to the listing:

Experimental Art Quilt #1 – Green, Aqua, Blue

A little weekend quilting

Practicing on remnants of a baby quilt project.

I met my friend Kate in 2016 while we were both teaching craft and sewing classes at JoAnn Fabrics and Crafts in the Deer Creek Shopping Center in Maplewood. I was not a quilter when I started teaching there, nor was I an expert seamstress. I had quite a bit of experience with simple hand sewing so I was skilled enough to teach kids’ and adults’ beginner level classes in hand sewing and embroidery. I also taught jewelry, paper crafts, some flower arranging, and general crafts. The JoAnn classroom is on hiatus right now. If they ever start having classes again it might be awhile before I can do it again because of other projects – some of which I can write about on this blog and some that I can’t!

I was given some scraps and pieces of things left over from teaching to practice my skills on. The baby quilt section shown above was a remnant that some other teacher pieced as a demo. This section was cut off and discarded so I took it to practice on. I have three other quilts in progress right now – two experimental art quilts and a repair job on a vintage quilt. When I need to move up a skill level, Kate helps me out by showing me some tips and techniques. I’m working a bit on each quilt to improve my techniques as needed to finish the next steps on each. The baby quilt remnant I was given is long and narrow so I’ve decided that when I’m done quilting it, I’m going to turn it into a sleeping bag for dolls and stuffed toys.

The last steps of quilting my sleeping bag on the left, and one of Kate's finished quilts is on the right.
The last steps of quilting my sleeping bag on the left, and one of Kate’s beautiful finished quilts is on the right.

I thought I was finished quilting last week, and I hand washed my quilt to clean any dirt off from my hands and get the blue washable marking pen lines off. Unfortunately, I tend to save up a bucket full of hand washable items to wash all at one time to conserve water, and I carelessly washed the quilt with some old fabric items (more about that later) that were so old I didn’t think they would bleed. Apparently they had never been washed before and they bled a little dye on four panes of this quilt. Fortunately I found some fabric in my stash to applique and re-quilt over those squares, that not only goes well with the colors, but features a terrific motif for a toy sleeping bag because of the camping theme. That gives me some more ideas for how to accessorize the sleeping bag to make it “adventure ready”! Now I’m going to like this project even better – that’s one of the life skills art and crafts are good training for – turning problems into wins!

The Comfort of Old Fabrics

Arkansas snowflake quilt being repaired
My friend Kate, who is a quilt expert, found the name of this quilt pattern in an old quilt book of hers, and gave me some repair tips too.

There are personal, regional and world-wide reasons why the last few weeks of life have been especially difficult. I’m not the only one who seeks solace in art and craft activities, especially ones that bring back warm memories of cozy winter afternoons spent with my family making things. There is nothing better on a cold wintry day.

It’s been nice snuggling under the old family quilt my mother in law gave us recently. It was made in the 1930s by my husband’s grandmother and friends. I was given it in the hope I’d make something from it, since it has a few areas of damage and I’m well known for making new things out of old things – a lifelong pursuit. I decided to repair some of the spots before it gets worse, because most of it still looks good and for now I’d prefer to use it than upcycle it if possible.

Patching damaged star points with applique.

I could have purchased fabric for repairing this quilt that matches more closely to the old fabric to disguise the repairs more, but I decided to approach this repair as adding a little of my own history to this quilt instead of trying to do a museum quality restoration. I looked in my extensive fabric stash to see how close I could approximate the colors and patterns with what I have, and decided it still looked good and I would enjoy the little differences and the memories from my fabric scraps. My Mom made me a tablecloth out of that multicolor floral print on the right in the early 1980s, and Kate gave me the blue floral scraps, for example. Every time I see the fabric I will remember them and others, that is one of the best things about quilts and quilting. This repair is very satisfying to work on because I’m adding memories and functionality as I go.

Old quilt my Dad gave me, being washed on the left and after washing on the right.
Old quilt my Dad gave me, being washed in the bathtub on the left and after washing on the right.

My Dad recently went through some things in his basement, and he had an extra quilt that someone gave him so he passed it on to me to clean and repair. It doesn’t have any holes that go all the way through and very few torn patches so we’re using this one until the other repair is finished, then I’ll swap them out and repair the second one. I really get a kick out of these colors and patterns. They look to me like they are from the late 1940s or early 1950s.

I’ve been putting my toe in the water of learning quilting over the last two or three years. I have two art quilts in progress and one baby quilt. Kate is giving me tips as I need them. Repairing quilts is a great way to increase my skills along the way.

old_softies

In the above photo are some stuffed animals and little pillows I made in the 1970s when I was around the ages of 8-12. The rooster on the right was made from a commercial pattern that my Mom had in her stash and I think I still have it. The others were made by me from my own patterns – I’m not sure about the frog though. That one seems a lot more advanced than the others. It even has wire in it to make it poseable. Well, it probably is mine – it’s not symmetrical and I cut a hole in the back of the head to insert the wire and sewed it back up again, so that was probably an afterthought. The items on the right were recently extricated from my Dad’s basement and I had completely forgotten about most of them. I pretty much liked a lot of the same animals then as I like now – sea life, fish, invertebrates, birds, frogs! I loved little pillows with pockets, then and now! I felt very satisfied when I made these, and I love looking at them now for the memories of where those fabrics came from and how much fun I had. Maybe I’ll make some of these into patterns for kids – that’s one way to make sure a kid can do it! I know there are people who will make kid’s drawings into things, including softies. That’s a fantastic idea I think! I think I’d enjoy teaching kids how to make patterns from their drawings. I’ve loved making patterns since I was young too, though I enjoy following someone else’s from time to time – it rests the brain a little bit!

monster_bunny_and_chicks

In 2019 I made the above softies for a niece and nephews. They were both modified from other designs I saw online. The chickens have a little pocket for hiding things under the wing, that’s one of the things I added because I love pockets so much. The monster bunny has a stomach pocket too though I ran out of time to embroider a stomach and intestines  on it. My original vision of the monster rabbit also had some other ideas that got put aside as I was running out of time to get it done, but if I make another one I could give them another try. I made a deliberate choice to use crazy mixes of scrap fabric in order to pass on some of my fabric memories to them – even though they don’t know what most of them are, it feels satisfying somehow! I can still enjoy the memories looking at these pictures!

Fabric snake
Found another one! Fabric snake I made when I was somewhere in the age range of 8-12.

Made From Scraps: Mini Accordion Books

Many years ago, as one of my Mail Art projects, I used to fold two-inch wide pieces of paper into little accordion books and decorate them with rubber stamps and pieces of paper that I cut out from incoming Mail Art and decorated envelopes. I carved a rubber stamp with a little graphic of a Mail Box and the words “Bits of Mail” to stamp on the little book covers. Before sending them out, I dated and numbered them on the back. I saved one example for my archives and made a few color copies to use later as collage inspirations. While I was getting the color copies made, it came up in conversation with the copy center worker that one of the black and white machines had red toner in it. I made a lot of copies with the red toner because I knew I’d find uses for the copies later!

One of my original mini accordion books from 1998 with some color and red ink copies I made at the time for future collage work.

Some of my old collage papers along with my Mail Archives had been in storage unseen for 20 years or more. I’ve been getting some of them out lately as I move stuff. With fresh eyes, I’m getting some new ideas and inspiration for improving old ideas. I decided to take these old copies and make new versions of the mini accordion books.

First I cut up the copies that weren’t already in strips into two inch wide pieces, the same size as the originals. Then I folded them and glued one red ink copy to one color copy back to back to make longer books.

Old copies with color ink and red ink cut into two-inch strips, folded and glued to make mini accordion books.

I had a large paper crafting stash by 1998 already because I started making collages in 1985 in my first college design class and I’ve been collecting interesting papers for collages ever since. In the intervening years, there are a lot more paper crafting supplies available and some of them are a lot more to my taste than what was available in the late 1990s. Back in the day I would have said I was a “weird” stamper not a “cute” stamper. I also enjoy sophisticated antique imagery and have a lot of papers from two of my favorite brands, Tim Holtz and 7 Gypsies, in my stash. I decided that the Tim Holtz idea-ology Correspondence paper pad was a good fit for this project and I glued some of the postal themed textures onto a selection of the blank pages of my books. The dominant colors in this series are red white and blue which looks good with the red toner ink on some of my papers and the postal motifs fit the “Bits of Mail” theme.

Next I went through I box of paper scraps that I keep for teaching a card class that I run from time to time on how to make greeting cards from little scraps, rubber stamps and stencils. I took out a selection of papers that I thought would make good backgrounds and glued them in a random fashion to every other page, leaving some blank.

Mini accordion books ready for adding content.

There is an old trick that I learned in drawing class long ago to help get unstuck if you are facing a blank piece of paper with no ideas – draw a quick frame around your drawing area before you start. This helps because it’s less daunting to start drawing on a paper that you’ve made some marks on than a blank surface. I get the same creative boost from using scrap papers for perhaps a similar reason – there is already some content there, however sparse and random, and that is often all I need to get me going in a creative direction.

The little accordion books I’ve made are pictured above ready to add content. What kind of content would that be? There are lots of things I could do with these little books. I could write, draw, stamp or paste in words and/or images to make a finished artistic statement. I could use them as a storage and display folio for tiny works of art such as postage stamps, faux postage stamps or tiny photos and images. I could send them off into the Mail Art network as an “add and pass on” project. What would you make?

tiny books made by various artistsFor additional inspiration, here are some samples of tiny books made by other people that I’ve received through the mail over the years. People of any age and ability level can make tiny books. Why not try one?