Tag Archives: fabric scraps

Sitting by water and sewing – one of my favorite ways to relax

Sewing and relaxing by the water
Sewing and relaxing by the water. Far left – working on Experimental Art Quilt #1 in our backyard last summer within view of our pond, enjoying the waterfall sounds. Middle and right, Cole’s Creek campground at Carlyle Lake in Illinois. I’m at the far right under the camper canopy working on a salmon-colored shirt that I am patching and stitching on.

When I’m fortunate to get some time to relax, I like to take a portable art project like hand-sewing outdoors to work on. If I can set myself up by water, that’s even better! Better still to add human companionship by going on a group campout. It’s always nice to take a little break from kayaking and other active pursuits and sit down around a campfire. If I should happen to get stuck with a lot of rainy weather and have to stay under a shelter for awhile, I’ll never be bored waiting it out if I have sewing with me to do. I have more camping trips planned for this season so I’ve prepared some next steps in three different current sewing projects to work on while I’m out there. These are easy to transport rolled up and carried in a bin with a selection of sewing threads and tools.

Experimental Art Quilt #2 in progress
Experimental Art Quilt #2, begun in 2019, in progress.

I’ve readied the right side of Experimental Art Quilt #2 in preparation of adding some accents in blue scrap fabrics and blue thread. The image above shows how I used computer graphics to plan out the red triangle area that I sewed during the last campout. I knew the finishing touches on this were going to either make or break it, so I tested out the red area in Adobe Illustrator first before stitching it. I think after adding the blue area, I’ll go back to the pale yellow areas for a bit of subtle texture, then I think it will be ready for the border to complete it.

Scraps plus reverse applique

Here are some of the scrap strips I made earlier combined with some fabric that is going to frame it in a reverse applique technique. I make a lot of strips of both paper and cloth scraps to incorporate into other projects later. I’m turned on by the idea of one stripe being colorful and rest being all neutrals.

Making scraps into stripes
Far left: a journal cover made with strips of paper scraps. I revisit this way of working with paper and over and over and still not tired of it. Middle: an apron with strip piecing and applique on the front. I was going to add embroidery in the middle but decided it was enough without it. Seeing this image again of what I planned makes me want to make another one to see what the original idea would have turned out like. On the right is my mother-in-law with the reverse applique Easter apron I made for her.
Pattern from my favorite shirt in the 80s
My favorite shirt in the 80s and lifting the pattern from it.

My favorite shirt from the 80s is on the left. It used to be white and black with short sleeves and a collar. Over the years, it got so stained and faded that I stopped wearing it, but I could not bear to get rid of it because I loved the pattern so much. In 2018 I dyed it my favorite color lime green when I had a batch going for my wedding, and last summer I cut the collar and sleeves off and made it into a vest. Now I wear and enjoy it once more!

On the right is that salmon-colored shirt I’ve been stitching on. When I bought this shirt it was white with black. Yes I still love black and white shirts with Aztec-looking designs on them! The first time I wore it, it got stains on it from riding a chartered party van to and from a Rush concert (May 2015 during their farewell tour – EPIC day and night by the way – my brother and his friends started partying at brunch, I joined in a group pre-show BBQ about 3 pm after getting my day’s work done). I don’t know what got on the shirt, but I could never get it out. I put it aside for future dye experiments to try to fix it. I made two different mistakes when dyeing because I was in a hurry and ended up with even more stains and splotches to try to cover up. So I decided to put embroidered patches on all the bad spots until they were all covered up.

Shirt patches #2
Transferring design traced from older shirt to patches for newer shirt. I scrambled the old design a bit to make it just a little different. That’s not the first time I’ve reproduced part of this shirt design for a project – my very first experiment with linoleum block printing in 1985 used part of it! I wanted to print it on EVERYTHING.

Patches on the front are done, though as it gets closer to completion I might add some decorative trim from top to bottom around the center panel to tidy it up. It doesn’t have to be symmetrical, but I think it needs to be a little neater. Now I’m starting work on the back. Sleeves will be last. Although the look is different, the concept of patching clothing with decorative stitching was done very well by the Japanese with the art of Boro, which I would love to try out in the more traditional Japanese manner sometime.

This was a lightweight, airy shirt when I first bought it – now it’s going to be a bit heavier because of the layers, maybe for fall wear. Probably when it gets close to completion I’ll add some white or metallic or both to the yoke area to bring the focus back to the neckline area. In the meantime, I’m having a lot of fun doing the stitching in different weights and colors of thread, like salmon, peach, rust, and coral to see what happens!
Give a piece of print fabric the look of a “blanket”

Recently I was working on a sleeping bag for a doll, and I was looking around the house for a doll or stuffed animal that I could use to test out the size. I didn’t use it because it was too big, but I did look at a doll of sorts that I made a long time ago in sculpture class when I was working on a B.F.A. degree at SIUE. At the time I had taken the class, I had just been on a trip to Utah and had brought back with me some books on Native American petroglyphs and stone fetishes. I made a throw pillow sized soft wolf fetish with blanket and soft arrowhead for my late friend June for Christmas that year. We both shared an intense interest in Southwest travel and art. For class I made a humanoid stuffed figure with amulet bag, loincloth, and blanket.

While making the soft sculpture, although inspired by ancient Native American art forms, I did not want to refer to any particular culture exactly, rather I wanted to evoke an ancient sense of humanity that many cultures share. Throughout human history there were many ways to wear and use blankets as a part of clothing and outerwear before things like buttons and zippers were invented, and of course people still use and wear blankets in many ways today. For my soft sculpture’s blanket I chose a fabric in a garish early 1990s fabric pattern to suggest a striped blanket but not imitate any particular culture.

While working on my doll sleeping bag, I decided it was a good time to update the look of my soft sculpture. Since teaching at JoAnn Fabrics and Crafts from 2016-early 2020 I’ve been working a lot more with fabric. I decided to start with the blanket. I have a large collection of scrap fabric that I like to sew into strips to use in projects such as art quilts, purse straps, water bottle carrier straps, table runners, headbands, and more. I thought the blanket I made for the soft sculpture would look more attractive with some added strips of scrap fabric so I started piecing and sewing strips in place.

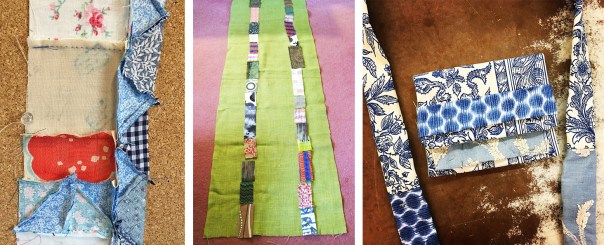
Experimental projects using fabric scraps.
Experimental projects using fabric scraps. From left to right: what will become part of Experimental Art Quilt #2 (still in progress), a table runner that I have used in many art and craft shows, and a purse with strap that I made for a niece as a graduation gift. The purse folds out so that it can be used as either a little clutch purse or a water bottle carrier. The strap is removeable and can be used in different ways.
Old blanket piece with new scrap strips held up against it to see if the colors and patterns look good together.
Left: old blanket piece with new scrap strips held up against it to see if the colors and patterns look good together. Right: an endcap I put together for Schnarr’s Hardware in Webster Groves, MO to showcase some supplies for fun summer craft and home decor projects. I used my refreshed blanket a backdrop for some blank wood succulent shapes ready for painting and decorating. On the other half, I draped a piece of nautical themed fabric. Over both backdrops are hung nautical themed flags that I sewed last summer.
Here is how to start a scrap strip.

Here is how to start a scrap strip. Decide on a color scheme and lay out pieces of fabric to use. Here I decided on a neutral scheme for a future project.

Place fabric pieces good side together, and pin along one edge. Keep going until you have pinned enough pieces to make a strip as long as you need for your project. The first two photos show the same strip from the front first, and then the back, after pinning.

Using a washable fabric marking pen and a ruler, draw a line along one edge, leaving a small seam allowance. Drawing the lines will help you keep your seams straight.

Sew all the pieces together and you’ll have a strip that you can use for many projects.

Temporarily pinned stripes in place on print fabric to see how the colors and patterns look together.
Temporarily pinned stripes in place on print fabric to see how the colors and patterns look together. A fabric pattern that has some kind of stripes or regularly spaced shapes that you can use to line up your stripes will save you a little time measuring and drawing lines on your fabric, but of course any fabric that looks good as a background would work.

I finished the quilted sleeping bag for dolls

In a past blog post, A little weekend quilting, I showed a narrow quilt top remnant that I was given and described how I was quilting it for practice.

A long narrow quilt top remnant that I decided to turn into a doll sleeping bag.

I used new cotton batting for the middle layer and a piece of a ripped gray bed sheet as the backing. I took parts of the waistband from an old pair of jeans and sewed them to each end, then used gray quilting seam binding to finish the edges. I used a piece of the seam binding to make a loop for hooking on a carabiner to hold the doll’s adventure camping gear.

The poor beat up Raggedy Ann doll was mine when I was young. I am pretty sure my Grandma Hasenfratz made it for me. She was an expert at sewing and crochet. She made me a lot of great things, many which I still have! I don’t know what happened to this poor doll’s clothes, but I’m thinking of making some new ones for her for the heck of it!

I sewed a lot of doll clothes when I was young – they were not well done. A lot of them were just draped fabric scraps that I sewed on and then ripped off when I got tired of them! In my mind my Barbie doll was an explorer and archaeologist by day but she must have had a very active night life as well – I sure did make her a lot of evening gowns! I had a kit to help me make good Barbie clothes but I don’t think I ever mastered it. I’d like to get some practice at making some that look reasonable, if there is time someday.

For the finishing touches on the sleeping bag, I made a two-sided pillow. I sewed one side of the bag together only about halfway up to that it’s easy to get a doll in and out, and put in snaps for a snug fit on cold nights!

I didn’t write down my process while making this, but I did take a lot of pictures so I can remember what I did if I ever want to make another.

The Comfort of Old Fabrics

Arkansas snowflake quilt being repaired
My friend Kate, who is a quilt expert, found the name of this quilt pattern in an old quilt book of hers, and gave me some repair tips too.

There are personal, regional and world-wide reasons why the last few weeks of life have been especially difficult. I’m not the only one who seeks solace in art and craft activities, especially ones that bring back warm memories of cozy winter afternoons spent with my family making things. There is nothing better on a cold wintry day.

It’s been nice snuggling under the old family quilt my mother in law gave us recently. It was made in the 1930s by my husband’s grandmother and friends. I was given it in the hope I’d make something from it, since it has a few areas of damage and I’m well known for making new things out of old things – a lifelong pursuit. I decided to repair some of the spots before it gets worse, because most of it still looks good and for now I’d prefer to use it than upcycle it if possible.

Patching damaged star points with applique.

I could have purchased fabric for repairing this quilt that matches more closely to the old fabric to disguise the repairs more, but I decided to approach this repair as adding a little of my own history to this quilt instead of trying to do a museum quality restoration. I looked in my extensive fabric stash to see how close I could approximate the colors and patterns with what I have, and decided it still looked good and I would enjoy the little differences and the memories from my fabric scraps. My Mom made me a tablecloth out of that multicolor floral print on the right in the early 1980s, and Kate gave me the blue floral scraps, for example. Every time I see the fabric I will remember them and others, that is one of the best things about quilts and quilting. This repair is very satisfying to work on because I’m adding memories and functionality as I go.

Old quilt my Dad gave me, being washed on the left and after washing on the right.
Old quilt my Dad gave me, being washed in the bathtub on the left and after washing on the right.

My Dad recently went through some things in his basement, and he had an extra quilt that someone gave him so he passed it on to me to clean and repair. It doesn’t have any holes that go all the way through and very few torn patches so we’re using this one until the other repair is finished, then I’ll swap them out and repair the second one. I really get a kick out of these colors and patterns. They look to me like they are from the late 1940s or early 1950s.

I’ve been putting my toe in the water of learning quilting over the last two or three years. I have two art quilts in progress and one baby quilt. Kate is giving me tips as I need them. Repairing quilts is a great way to increase my skills along the way.

old_softies

In the above photo are some stuffed animals and little pillows I made in the 1970s when I was around the ages of 8-12. The rooster on the right was made from a commercial pattern that my Mom had in her stash and I think I still have it. The others were made by me from my own patterns – I’m not sure about the frog though. That one seems a lot more advanced than the others. It even has wire in it to make it poseable. Well, it probably is mine – it’s not symmetrical and I cut a hole in the back of the head to insert the wire and sewed it back up again, so that was probably an afterthought. The items on the right were recently extricated from my Dad’s basement and I had completely forgotten about most of them. I pretty much liked a lot of the same animals then as I like now – sea life, fish, invertebrates, birds, frogs! I loved little pillows with pockets, then and now! I felt very satisfied when I made these, and I love looking at them now for the memories of where those fabrics came from and how much fun I had. Maybe I’ll make some of these into patterns for kids – that’s one way to make sure a kid can do it! I know there are people who will make kid’s drawings into things, including softies. That’s a fantastic idea I think! I think I’d enjoy teaching kids how to make patterns from their drawings. I’ve loved making patterns since I was young too, though I enjoy following someone else’s from time to time – it rests the brain a little bit!

monster_bunny_and_chicks

In 2019 I made the above softies for a niece and nephews. They were both modified from other designs I saw online. The chickens have a little pocket for hiding things under the wing, that’s one of the things I added because I love pockets so much. The monster bunny has a stomach pocket too though I ran out of time to embroider a stomach and intestines  on it. My original vision of the monster rabbit also had some other ideas that got put aside as I was running out of time to get it done, but if I make another one I could give them another try. I made a deliberate choice to use crazy mixes of scrap fabric in order to pass on some of my fabric memories to them – even though they don’t know what most of them are, it feels satisfying somehow! I can still enjoy the memories looking at these pictures!

Fabric snake
Found another one! Fabric snake I made when I was somewhere in the age range of 8-12.

Sew a Pillow Front From Selvage Pieces

A pillow front decorated with fabric selvage pieces.

Yes, I hand-sewed all those selvage pieces to the front of a blank canvas pillow cover. It’s the third one I did, and I’m in the middle of a fourth one now. Hand-sewing is something I love to do to relax. When I don’t have anything specific to make but I’m in the mood to sew, adding another strip or two is a great soothing activity for me.

Read my tutorial about how to make a pillow like this on the Canvas Corp blog:
Sew a Pillow Front From Selvage Pieces

Upcycled Tool Belt

A friend of mine gave me two unused canvas tool belts that advertise a hardware store that I don’t work for. I decided to cover up the advertisement and create a more robust belt loop by sewing on some recycled upholstery material. I used recycled trim, a recycled belt and some thread to make something that turned out really comfortable to wear. I’ll test the functionality today when I wear it to hold my hand tools while I work on the garden at a client’s house. Going to work is a lot more fun when you can express your personality with your tools!