Tag Archives: scrapbooking paper

Make a Greeting Card With a Star and Arrow

mixed media greeting cards

I designed this project around some collaged stars I had made awhile back while working on my previous tutorial, Making Greeting Cards From Scrap Papers. If you don’t want to make your stars in that style, you can use any paper or cardstock star of your choice.

This card design uses quite a few tools and materials, so if you are going to get them all out you might as well make several. Having extra cards on hand is a real time saver sometimes!

matching_stars_with_card_colors

Supplies:
Cardstock
Assorted small paper scraps
Decorative paper large enough to make envelopes
Tracing paper
Tape, single and double-sided
Pencil
Scrap chipboard
Glue stick
Black rubber stamping ink
Clean scrap paper
Envelope template – free download here for a template that fits a 5.5 inch x 4.25 inch card – Envelope template for Rectangular Card

Tools:
Greeting Card With Star and Arrow Template (free download here)
Paper cutter
Metal ruler
Self-healing cutting mat
Scissors
Rubber stamps with sentiments
Colored pencils
Prismacolor art stix or similar product (like Conte crayons in more than just basic colors)
Sharpie Pen
Sharpie Twin Tip Marker Fine/Ultra Fine
Squeegee or bone folder tool
Rubber stamp Bubble Border Small or other border stamp
Rubber stamp Rounded Squares and Rectangles Border Large or other border stamp
Stencil for the “awesome” arrow – Mini Word Arrows 6×6 Stencil – if you don’t have that stencil, you can use a stamp, stencil or paper of your choice for the small arrow portion of the card.

star_greeting_card_with_arrow

Instructions:

Download and print out my free template, Greeting Card Sketch – Star With Arrow.

Tape tracing paper over the printed out template, and make tracings in pencil over the star portion, the arrows and the shapes on either side of the star.

Write “front” on the tracings before you remove them from the template.

tracings

You’ll use these tracings to transfer your pencil markings onto the the backs of scraps of chipboard to make templates for tracing and masking.

To transfer, place your scrap chipboard pieces face down and flip your tracing paper over so that the back is facing up. Tape in place and go over your pencil lines. When you lift the tracing paper, you’ll have lines you can follow as you cut.

Out of one piece of chipboard, use a utility knife and a metal ruler to cut the two side shapes and the star out.

cutting_from_back

Make yourself templates for the large and small arrows as well.

cut_outs

Put the front of the card on your work surface and tape the stencil/mask over it. With a thin, light pencil outline the star and two side shapes. These light pencil lines will help you line things up in the later steps. Place the large arrow template where you would like it and trace around it too.

outlining_in_pencil

Stamp in black through the mask onto the front of the card, alternating the border stamps you are using.

stamping

Lift the mask to see that portions of the front of the card are partially filling the cut out shapes. This is a technique you can use with stencils or masks you cut yourself or with purchased stencils.

stamped_template_lifted

At this point, you can choose to erase your pencil guide lines, or disguise them by drawing over them with a marker or color pencil. I drew over mine with harmonious colored pencil colors.

green_web

Choose an art stick color and go over your outlines heavily, and the insides of your shapes lightly.

green_web_2

Choose a 1″ x 5.5″ piece of scrap decorative paper in a harmonious color. Fold it lengthwise, apply glue to the back and use it to cover the fore edge of the card.

Trace the large arrow onto a piece of decorative paper and cut it out. Glue it in place on the front of the card.

Take a bright, lighter piece of paper and tape it to your work surface.  Tape your stencil over the paper so that the paper shows through the word “awesome”. Outline the “awesome” arrow and lettering with a black Sharpie pen, then lift the stencil and finish filling in the arrow with the fine tip of a Sharpie double-sided black marker.

awesome

Glue the star and small arrow to the front of the card. Accent the lower and rightmost edges of the star and small arrow with the thick tip of the double-tipped Sharpie marker.

Make an envelope for your card by tracing Envelope template for Rectangular Card onto the back of a piece of decorative paper, then folding it and taping it together. Your’e done!

Mixing Brands in Vintage Inspired Handmade Journals

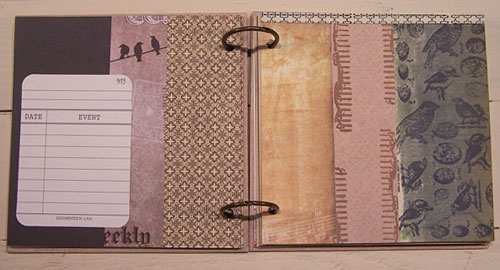
My paper crafting and mixed media supply stash is substantial. Recently when I wanted to make some vintage inspired handmade journals as gifts I was faced with a pretty overwhelming number of options. Sometimes if you have too many supplies you can feel overwhelmed and a little inhibited. To get my creativity revved up I decided to see what I could come up with if I limited myself to three brands only – Canvas Corp Brands, Tim Holtz and DCWV. Those three brands still give you a huge number of options don’t they – not much of a limitation! I narrowed the possibilities a little further by setting out items from this list in my studio:

  • 7gypsies Gypsy Paper Pack Collection – American Vintage
  • Architextures™ 12×12 Papers – Collection I
  • Canvas Corp Black & Kraft Postcard Paper
  • 7gypsies Gypsy Moments Cards: Are We There Yet?
  • 7gypsies Gypsy Paper Pack Collection – Gypsy Seamstress
  • Architextures™ 12×12 Papers – Collection 2
  • Canvas Corp Nautical: Black and Ivory Compass Paper
  • Architextures™ Parchment Rub-On – Build
  • Canvas Corp The Watering Can: Seed Packets on Ivory Paper
  • 7gypsies binding rings
  • 7gypsies ephemera (discontinued)
  • 7gypsies papers (discontinued)
  • 7gypsies paper tape (discontinued)
  • DCWV Everyday Essentials Stack
  • DCWV Heirloom Stack
  • Tim Holtz design tape
  • Tim Holtz papers
  • Tim Holz ephemera
  • Tim Holtz mini brads
  • Ok I cheated a little bit – in the second journal I needed some patterned translucent paper so I slipped in some Vellum Swirls paper by Paper Pizazz.
  • Yes, that is still a lot of product to choose from, but it’s at least a somewhat more manageable subset of my stash! These slide shows feature 8.5 x 5.5 inch pages in pairs, starting with the front and back covers.

    Vintage Look Journal #1

    Vintage Look Journal #2

    Using paint as a background for journaling pages

    I recently made some abstract painted backgrounds for a class I’m going to be teaching at JoAnn Fabrics and Crafts. I will be demonstrating how to make mixed media pages for journaling with acrylic paint, watercolor paint, assorted markers and Fiskars gel pens. I embellished my sample pages further with decorative scrapbooking paper, stickers, paper tape and rubber stamps. The binding rings I used in these samples are by 7gypsies.

    On the left is one of the pages I painted with acrylic paint using a water wash technique. Besides some painted paper scraps, on the right I also used some scrapbooking paper, decorative paper tape, and a word from the rubber stamp set “B Journal Stamps” by Teresa Collins.
    I emphasized a paint splotch with a die-cut circle embellished with gel pen doodling. On the right side page I used a couple of Heidi Swap stickers over some doodled circles and small die-cut circles. The paper patterns and colors in the paper pad The Everyday Essentials Stack by DCWV blend really well with the painted backgrounds so I used a lot of designs from that stack in this project.
    Product used on these pages: markers, gel pens, Heidi Swapp stickers, punched out paper shapes, Everyday Essentials paper, Mrs. Sparkle & Co. planner stamps.
    Product used on these pages: translucent vellum scrapbooking paper with gold designs, Heidi Swapp Stickers, B Journal Stamps, markers and Everyday Essentials paper.
    Product used on these pages: markers, B Journal Stamps, paper tape.
    Product used on these pages: Everyday Essentials paper, B Journal Stamps, paper tape, punched out paper circles, markers.
    Product used on these pages: Mrs. Sparkle & Co. planner stamps, paper tape, Heidi Swapp Sticker, a sheet from the stack Heidi Swapp Memory Planner Journaling Pages, punched out card stock circles.
    Product used on these pages: B Journal Stamps, Everyday Essentials paper, markers, Heidi Swapp sticker, a cut up Heidi Swapp journaling page, punched out circles.
    Product used on these pages: Punched out circles, a cut down Heidi Swapp journaling page and sticker, B Journal Stamps, Mrs. Sparkle & Co. planner stamps, metallic paper tape, markers, Everyday Essentials paper.
    Product used on these pages: Everyday Essentials paper, gel pens, markers, translucent vellum paper with metallic designs, Mrs. Sparkle & Co. planner stamps, punched out circles, B Journal Stamps, paper tape Heidi Swapp stickers..

    I hope these samples inspire you to take a class with JoAnn or experiment with mixed media journal and planner pages on your own!

    See these Pinterest Boards for more ideas:

    Planners, Journals, Albums, Scrapbooks and Handmade Books

    Art Journaling

    Make a Mini Album – 4 1/4 x 4 3/4 Inches

    Make a mini album
    Make a mini album!

    I make a lot of 6 x 6 inch pages for handmade journals. When you cut a 6 x 6 inch piece of paper out of an 8.5 x 11 piece of paper you’re left with a lot of leftover 8.5 x 5 inch pieces. Here is a project that will use up those extra pieces and possibly some of your other paper scraps as well. If you’re a regular reader of mine you know I try not to waste anything!

    What you’ll need:
    Text weight paper
    Card stock
    Decorative papers
    Paper cutter
    Glue stick
    Self-healing cutting mat
    Metal ruler
    Bone folder/burnishing tool
    Clean scrap paper
    Scissors
    Double-sided tape
    Awl or needle tool
    Small hole punch
    Brads
    Heavy thread or lightweight cord
    Beads

    1. Download the template Mini Album and print it out to use as a guide.

    2. Cut out a piece of 8.5 x 4.75 inch card stock. Fold in half.

    3. Out of decorative papers, cut 2 8.5 x 1 pieces and 4 4.75 x 1 pieces.

    4. Fold one of the 4.75 x 1 inch pieces lengthwise and make a sharp crease with the bone folder. Flatten out and apply glue to the back. Glue down on the inside fold seam and burnish well (see A on template).

    Glue paper piece to the inside fold seam.
    Glue paper piece to the inside fold seam.

    5. Fold and glue two more 4.75 inch pieces to the edges (see B on template).

    Fold two more pieces to the edges and glue down.
    Fold two more pieces to the edges and glue down.

    6. Fold and glue 8.5 x 1 inch pieces to top and bottom edges (see C on template). Burnish all well.

    Glue two pieces lengthwise along top and bottom edges.
    Glue two pieces lengthwise along top and bottom edges.

    7. Fold another of the 4.75 x 1 inch pieces lengthwise and make a sharp crease with the bone folder. Flatten out and apply glue to the back. Glue down on the outside spine and burnish well (see A on template).

    8. Cut out four pieces of 4.25 x 3.75 inch decorative paper. They can be all the same or all different. Glue to the front and back covers, inside and out. If you want to decorate the front cover further with more embellishments you can. Burnish all well.

    Glue decorative papers to front and back covers.
    Glue decorative papers to front and back covers.

    9. Cut out front and back pocket pieces, fold in tabs and tape in place with double-sided tape.

    Add pockets to inside covers.
    Add pockets to inside covers.

    10. Cut out twelve pieces of 8.25 x 4.75 text-weight paper. Fold all in half and nest pages. Use paper cutter to trim the paper that sticks out.

    11. Using template as a guide for placement, punch four holes in the front cover with an awl, needle tool or small hole punch, and four holes in the back. Push brads in holes.

    12. Using template as a guide, punch small holes in spine of paper and album cover with awl or needle tool.

    13. Cut off a piece of cord that is about 28″ long. Thread the cord onto a needle and poke into the top first hole from the outside in, leaving about 7″ of cord trailing.

    13. Run cord through the rest of the holes according to this sequence – second hole inside to out, third hole outside to in, fourth and bottom hole inside to out, third hole outside to in, second hole inside to out, then tie off. Add beads to cord if you want.

    You’re done!

    Handmade Birding Journal

    Cover of birding journal. Cover collage is made of found images, scrap papers and rubber stamped images from 7gypsies and Carolyn's Stamp Store.
    Cover of birding journal. Cover collage is made of found images, scrap papers and rubber stamped images from 7gypsies and Carolyn’s Stamp Store.

    Here is a great handmade gift idea for someone in your life that loves to watch birds. A blank journal like my sample provides places for notes, sketches, photos, memorabilia and more. Here is how to make one.

    First download my free template, Square 6×6 Journal. Print it out and use it as a guide.

    Cut out two pieces of chipboard for covers. Make a collage of bird related images for the front cover. Cover edges of cover with decorative paper. Cover inside front cover, inside back cover and back cover with decorative paper.

    To assemble front cover, cut out a piece of acetate and punch small holes. Punch small holes in front cover collage and attach to cover with brads. Make pockets and attach to both inside covers with double sided tape. Cut out a number of pieces of cardstock for inside pages. Embellish with brayered backgrounds, sponged backgrounds, decorative papers, Project Life cards and rubber stamps. Punch holes in all pages and covers and compile together with binding rings. Open rings and add new pages as needed.

    Here are some sample page spreads to give you ideas for the interior pages.

    A set of inside pages. On the left is a Project Life card and on the right are rubber stamps from 7gypsies and Carolyn's Stamp Store. Patterned papers are from 7gypsies.
    A set of inside pages. On the left is a Project Life card and on the right are rubber stamps from 7gypsies and Carolyn’s Stamp Store. Patterned papers are from 7gypsies.
    On the left is a cut-down Project Life card and on the right are rubber stamps from 7gypsies and Carolyn's Stamp Store. Patterned paper is from 7gypsies.
    On the left is a cut-down Project Life card and on the right are rubber stamps from 7gypsies and Carolyn’s Stamp Store. Patterned paper is from 7gypsies.
    On the left is a Project Life card and on the right are rubber stamps from 7gypsies and Carolyn's Stamp Store. Patterned paper is from 7gypsies.
    On the left is a Project Life card and on the right are rubber stamps from 7gypsies and Carolyn’s Stamp Store. Patterned paper is from 7gypsies.
    On the left is a Project Life card and on the right are rubber stamps from 7gypsies. Patterned paper is from 7gypsies.
    On the left is a Project Life card and on the right are rubber stamps from 7gypsies. Patterned paper is from 7gypsies.
    On these two pages patterned paper is from 7gypsies and rubber stamps are from 7gypsies and Carolyn's Stamp Store. The plain paper insert on the right is a piece of sketching paper - it's good for drawing a sketch and it's removable if you want to use watercolor or other media that is messy.
    On these two pages patterned paper is from 7gypsies and rubber stamps are from 7gypsies and Carolyn’s Stamp Store. The plain paper insert on the right is a piece of sketching paper – it’s good for drawing a sketch and it’s removable if you want to use watercolor or other media that is messy.

    Stamps: Small word stamps are from Carolyn’s Stamp Store, other stamps are from 7gypsies.

    Here are links to other products you can use for this project:

    Binding Rings

    Long Fasteners (Brads)